An eye-catching and beautiful widget for Blogger, Wordpress and Custom Designed Website with hover features. Before we have seen so many widgets on the Blogger and wordpress also I have shared a jQuery Social Media Sidebar Widget but that one we just install on Blogger template, not for other sites such as wordpress or custom designed website. However, this time I have gain the experience of both Blogger, Wordpress also custom designed website and I have checked it personally its works in Wordpress Blogger and Custom Designed Blog or website. This Beautiful Social Media Widget has four different and biggest Social Media Platforms subscription button and that is Facebook, Twitter, Google Plus and Youtube with RSS Subscription. All these buttons will help your to attract your visitors to subscribe your Social Media Channels and Page and in a result your will receive more traffic after sharing any Blogger post on your social media pages.

Related:- Mouse Hover Cool Social Media Widget for Blogger
How to Install Striking Mouse Hover Social Media Subscription Widget
As I have mentioned above for installing this widget in different platform such as Blogger, wordpress or custom designed website or Blog.
This is the codes for the mentioned above widget
CSS Code
.StarsBloggingSocialButtonsBorder {
margin:0 auto;
padding:5px;
width:auto;
border-radius:5px;
border: 1px #BBBBBB solid;
}
#ttiblog-SexySocialButtons{
list-style:none;
text-decoration:none;
font-size:0.9em;
font-family:trebuchet ms,sans-serif;
}
#ttiblog-SexySocialButtons a{
text-decoration:none;
font-family:trebuchet ms,sans-serif;
}
#ttiblog-SexySocialButtons li{
position:relative;
height:38px;
cursor:pointer;
padding: 0 !important;
}
#ttiblog-SexySocialButtons .facebook, .googleplus, .YouTube, .rss, .twitter{
position:relative;
z-index:5;
display:block;
float:none;
margin:5px 0 0;
width:210px;
height:38px;
border-radius:5px; background:url(http://1.bp.blogspot.com/-JKq0eFFwx34/UGx39fhHO_I/AAAAAAAABE4/56i9phAS2do/s1600/NBT+Sprites+Social+Icons.png) no-repeat;
background-color:rgba(217,30,118,.42);
-webkit-box-shadow:rgba(0,0,0,.28) 0 2px 3px;
-moz-box-shadow:rgba(0,0,0,.28) 0 2px 3px;
box-shadow:rgba(0,0,0,.28) 0 2px 3px;
color:#141414;
text-align:left;
text-indent:50px;
text-shadow:#333 0 1px 0;
white-space:nowrap;
line-height:32px;
-webkit-transition:width .25s ease-in-out,background-color .25s ease-in-out;
-moz-transition:width .25s ease-in-out,background-color .25s ease-in-out;
-ms-transition:width .25s ease-in-out,background-color .25s ease-in-out;
-o-transition:width .25s ease-in-out,background-color .25s ease-in-out;
transition:width .25s ease-in-out,background-color .25s ease-in-out;
-o-box-shadow:rgba(0,0,0,.28) 0 2px 3px;
}
#ttiblog-SexySocialButtons li:after{
position:absolute;
top:0;
left:50px;
z-index:2;
display:block;
height:38px; color:#ffffff;
content:attr(data-alt);
line-height:32px;
}
#ttiblog-SexySocialButtons .icon{
overflow:hidden;
color:#fafafa;
}
#ttiblog-SexySocialButtons .facebook{
width:32px;
height:32px;
background-color:rgba(59,89,152,0.42);
background-position:0 0;
}
#ttiblog-SexySocialButtons .twitter{
width:32px;
height:32px;
background-color:rgba(64,153,255,0.42);
background-position:0 -33px;
}
#ttiblog-SexySocialButtons .googleplus{
width:32px;
height:32px;
background-color:rgba(228,69,36,0.42);
background-position:-3px -66px;
}
#ttiblog-SexySocialButtons .YouTube{
width:32px;
height:32px;
background-color:rgba(174,45,39,0.42);
background-position:-2px -95px;
}
#ttiblog-SexySocialButtons .rss{
width:32px;
height:32px;
background-color:rgba(255,102,0,0.42);
background-position:-3px -126px;
}
#ttiblog-SexySocialButtons li:hover .icon,
.touch #ttiblog-SexySocialButtons li .icon{
width:210px;
}
.touch #ttiblog-SexySocialButtons li .facebook, #ttiblog-SexySocialButtons li:hover .facebook{
background-color:rgba(59,89,152,1);
}
.touch #ttiblog-SexySocialButtons li .twitter, #ttiblog-SexySocialButtons li:hover .twitter{
background-color:rgba(64,153,255,1);
}
.touch #ttiblog-SexySocialButtons li .googleplus, #ttiblog-SexySocialButtons li:hover .googleplus{
background-color:rgba(228,69,36,1);
}
.touch #ttiblog-SexySocialButtons li .YouTube, #ttiblog-SexySocialButtons li:hover .YouTube{
background-color:rgba(174,45,39,1);
}
.touch #ttiblog-SexySocialButtons li .rss, #ttiblog-SexySocialButtons li:hover .rss{
background-color:rgba(255,102,0,1);
}
HTML Code
<div class="ttiblogSocialButtonsBorder">
<ul id="ttiblog-SexySocialButtons">
<li data-alt="Follow us on Facebook"><a class="icon facebook" href="https://www.facebook.com/RazBlogs">Like us on Facebook</a></li>
<li data-alt="Follow us on Twitter"><a class="icon twitter" href="https://twitter.com/RazBlogs">Follow us on Twitter</a></li>
<li data-alt="Follow us on Google+"><a class="icon googleplus" href="https://plus.google.com/107999810544634403869">Circle us on Google+</a></li>
<li data-alt="Subscribe us on YouTube"><a class="icon YouTube" href="https://youtube.com/thzzahsan">Subscribe us on YouTube</a></li>
<li data-alt="Subscribe with RSS"><a class="icon rss" href="http://feeds.feedburner.com/RazHackingTricks">Subscribe with RSS</a></li></ul></div>
IMPORTANT! Please replace the highlighted Links from HTML Code
Striking Mouse Hover Social Media Widget for Wordpress Blog
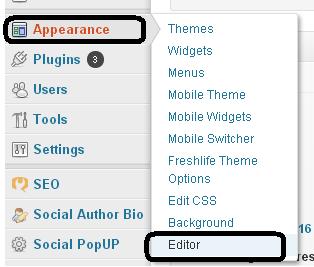
Just Copy above CSS code and paste it in the CSS Style sheet in wordpressGo to Appearance >> Editor >> Style.css and paste the CSS code as per screenshot shown below


Now again go Appearnace >> Widgets >> and insert Text Widget wherever in the theme you want place it and paste the above HTML code in Text Widget

Now check out You Wordpress Blog you will find there beautiful eye-catching widget.
Check :-Social Popup Widget with Email Subscription For WordPress
Striking Mouse Hover Social Media Widget for Blogger
Now its time to install the same widget in Blogger.
Simply copy the above CSS code and Go to Blogger Dashboard
Template >> Edit HTML and now search for ]]></b:skin> and paste the above CSS code before/above the ]]></b:skin>
Now copy the above HTML code and go to Layout Seciton in the Blogger Dashboard and Add a Gadget as per your requirement or where you want to place it and select HTML/JavaScript Gadget from Gadget List and Paste the Above HTML code
Save your template and check out this Striking and beautiful Mouse Hover Social Media Widget
Read:- Top 10 Social Media Widgets for Blogger
Striking Mouse Hover Social Media Widget for Custom Designed Website
For installing the same widget in your custom designed website follow the instructions below
Instead of above CSS code copy the given below link and paste it before the </head> tag
<link type='text/css' rel='stylesheet' href='https://raz-tipstricks-colour-picker.googlecode.com/files/social-media-sidebar-hover.css' />
Now its time to insert HTML code and its depend on your own so paste it where you want inside the <body> tag
<body>
Above HTML code here as per your required place
</body>.
Another Related Articles
- Metro Style Social Media Subscription Widget
- Image Hover Social Media Sharing Buttons
- Popup Social Media Subscription Box with Facebook, Twitter Google Plus
Bottom Lines
All the above methods are personally checked by me. I have Blog on Blogger.com, Wordpress custom domain and having personal designed website and checked the above widget in the above mentioned platform working properly. In case any further assistance you can ask by reply in this post. Regards..


No comments:
Post a Comment
Dont Spam Please